
Appium setup for Android in Windows OS
This post talks about the following sections
1. JDK Installation
2. Android SDK Installation
3. Appium Installation
1. JDK Installation:
- Go to the Manual download page
- Check the Accept License Agreement radio button
- Click on corresponding JDK version, then File Download dialog box appears prompting you to run or save the download file
- To run the installer, click Run.
- To save the file for later installation, click Save.
- Choose the folder location and save the file to your local system.
Tip: Save the file to a known location on your computer, for example, to your desktop. - Double-click on the saved file to start the installation process.
- Set the environmental variable JAVA_HOME to JDK home directory like below

- Include %JAVA_HOME%\bin in PATH variable.
2. ANDROID SDK Installation:
- Go to the Manual download page.
- Download latest bundle
- Extract the file to a directory
- Set the ANDROID_HOME environment variable to sdk (Ex: D:\AndroidSDK\adt-bundle-windows-x86_64-20140321\sdk)
- Include %ANDROID_HOME%\tools;%ANDROID_HOME%\platform-tools;%ANDROID_HOME%\platforms; in PATH variable.
SDK Manager:
The Android SDK separates tools, platforms, and other components into packages you can download using the SDK Manager. For example, when the SDK Tools are updated or a new version of the Android platform is released, you can use the SDK Manager to quickly download them to your environment.
You can launch the SDK Manager in one of the following ways:
- From Eclipse (with ADT), select Window > Android SDK Manager.
- On Windows, double-click the SDK Manager.exe file at the root of the Android SDK directory.
- You can select which packages you want to download by toggling the checkboxes on the left, then click Install to install the selected packages.

AVD Manager:
An Android Virtual Device (AVD) is a device configuration that is run with the Android emulator. It works with the emulator to provide a virtual device-specific environment in which to install and run Android apps.
You can launch the AVD Manager in one of the following ways
- Run SDK Manager and select Manage AVDs from the Tools menu.
- From eclipse you can click on AVD Manager.

Creating the AVD:
Android Virtual Device Manager lets you create, update, delete, repair, and start AVDs

- Click the New button to create a new AVD and give the AVD details
- After creating the AVD , you could see the following screen


3. Appium Installation:
You can install the appium in two ways
- Using node.js
- Using appium.exe
Using Appium.exe
- Download latest version of appium from here
- After downloading unzip the file and navigate to appium folder
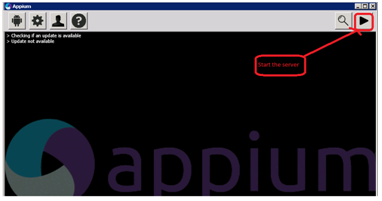
- Run the Appium.exe file, you could see the following screen

- To start the server click on start button like below
Using node.js:
- Go to the Manual download page
- Download the Windows Installer (.msi)
- To run the installer, click Run.
- After installing the node.js open the cmd prompt and use following commands
--> npm install -g appium # to install the appium
--> npm install wd # get appium client
- To start the server use appium &
- Appium: Remote Executing(Using Gird)
- Appium: Executing Android device through WIFI
- Appium: Executing through WIFI
- WebDriver: How to automate File downloading
No comments:
Post a Comment
:)