JBehave is a framework for
Behaviour-Driven Development (BDD). BDD is an evolution of test-driven development (TDD) and acceptance-test driven design, and is intended to make these practices more accessible and intuitive to newcomers and experts alike. It shifts the vocabulary from being test-based to behaviour-based, and positions itself as a design philosophy.
In this post i will be explaining, how to create sample Maven Jbehave project for Selenium.For this i am assuming that you have maven installed in your system and maven plugin for eclipse, if not you can have a look at this posts, this is pretty straight forward.
How to install Maven on Windows .
Installing m2eclipse – Maven Plugin for Eclipse.
Creating Maven Jbeave project form the command line:
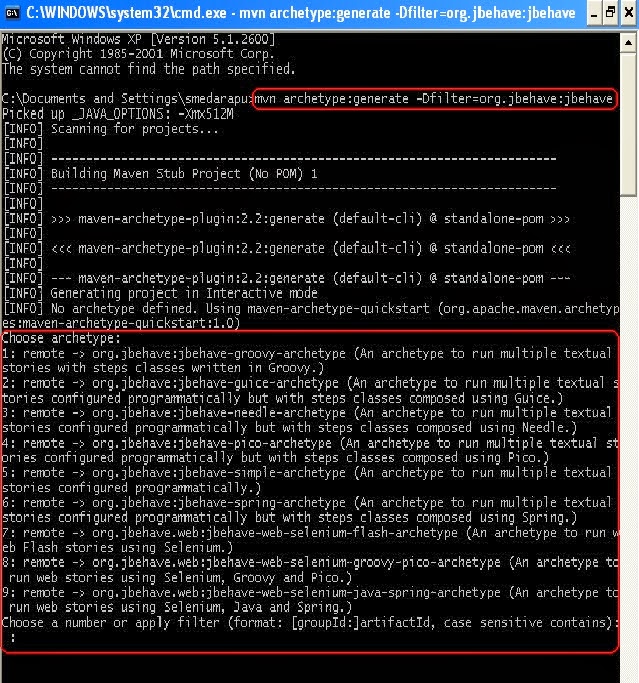
Execute following maven command in the command line
mvn archetype:generate -Dfilter=org.jbehave:jbehave
when you execute this command, maven will list out all the available of Jbehave atchetypes(simple project, groovy, web e.t.c)
As an example i am entering 5 (i.e Jbehave-Simple-archetype) as a input.
Then cmd line will ask for entering groupid .
what is groupid?
groupId will identify your project uniquely across all projects, so we need to enforce a naming schema. It has to follow the package name rules, what means that has to be at least as a domain name you control, and you can create as many subgroups as you want. Look at More information about package names.
eg. org.apache.maven, org.jbehave.selenium
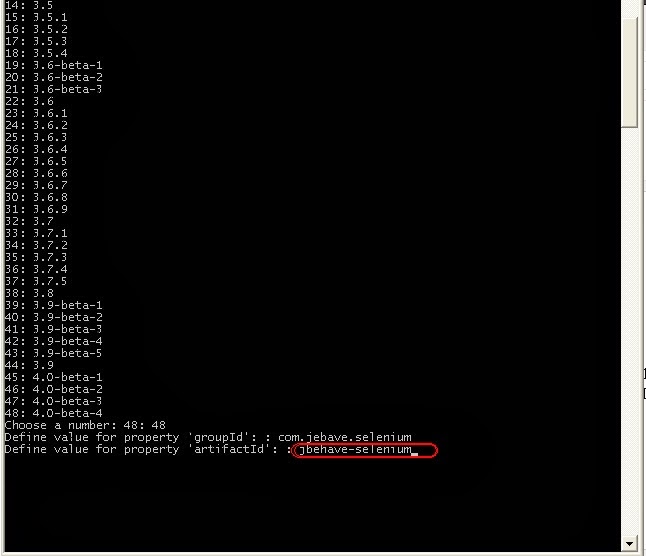
I am entering com.jbehave.selenium
Then cmd requests for artifactid
What is artifactid?
artifactId
- eg.
maven, jbehave-selenium
I am entering jbehave-selenium
Then cmd requests for
versionwhat is version?
version if you distribute it then you can choose any typical version with numbers and dots (1.0, 1.1, 1.0.1, ...). Don't use dates as they are usually associated with SNAPSHOT (nightly) builds. If it's a third party artifact, you have to use their version number whatever it is, and as strange as it can look.
Then cmd requests for package enter , after entering the package name cmd requests for
Confirm properties configuration: where you need to enter
Y
And finally you will getting a conformation message that Build Success as like bellow.
Configuring maven setup form the command line:
After creating the maven project you need to configure this project with the eclipse . For that you need to add the eclipse resource (jars) in order to do that we need to execute the following command by navigating to the maven project ( In our example i need to navigate to jbehave-selenium i.e artifactid )
mvn eclipse:eclipse
Open the Project in Eclipse :
Now Jbehave Maven project is created , open the eclipse set the workspace as created project's parent directory( In my case i have created the project in
C:\Document and Settings\smedarapu\jbejave-selenium , so i am setting workspace
at C:\Document and Settings\smedarapu )Now in eclipse click on
New --> Other ---> java --> java project-->Next then enter the project name what you have created (in my case it is
jbehave-selenium ), Finally click on
Finish .
Then project will be opened with the default code and in the following structure.
Now open the
pom.xml file and add the selenium dependency under the <dependencies> tag
Selenium maven dependency:
<dependency>
<groupId>org.seleniumhq.selenium</groupId>
<artifactId>selenium-java</artifactId>
<version>2.39.0</version>
</dependency>
Now will try to look at the coding part
Open the
my.story file and replace existing content with following content
Scenario: A sample scenario for Jbeahve with selenium
Given I am in FF
And I navigate to google
Then I verify search field
in the
MySteps.java add the following code
import org.jbehave.core.annotations.Given;
import org.jbehave.core.annotations.Pending;
import org.jbehave.core.annotations.Then;
import org.jbehave.core.annotations.When;
import org.openqa.selenium.By;
import org.openqa.selenium.WebDriver;
import org.openqa.selenium.firefox.FirefoxDriver;
public class MySteps {
static WebDriver driver;
@Given("I am in FF")
public void invokeBrowser()
{
driver = new FirefoxDriver();
}
@Given("I navigate to google")
public void navigate()
{
driver.get("http://www.google.co.in");
}
@Given("I verify search field")
public void verify()
{// verifying search element in google home page
driver.findElement(By.id("gs_htif0")).isDisplayed();
driver.quit();
}
}
Now right click on pom.xml Run As--> Maven Clean then Run As --> Maven install , you can see the test cases execution starts where the FF invoke then navigates to the google finally search for the searchfield in google field .
How it works...
For creating tests in JBehave, we will need to first implement stories as the .story file using
the Given, When, and Then structures. We need to describe the purpose of the story in the Scenario section, which contains the actual steps. We also
pass the required test data from these steps:
Scenario: A sample scenario for Jbeahve with selenium
Given I am in FF
And I navigate to google
Then I verify search field
Next, we map these steps using a step definition class(i.e in
MySteps ).
For each step, we use an annotation and implement a method to run that step. For example,
for the step
Given I am in FF we have defined the
invokeBrowser()
method as follows:
@Given("I am in FF")
public void invokeBrowser()
{
driver = new FirefoxDriver();
}
Along with a
story file and a
step definition class, a Configuration class needs to be
created, which will be based on the
JUnitStory class from the JBehave framework:
public abstract class
MyStories extends
JUnitStory
It also provides other configuration information, like the location of the story files and report
settings, and format the JBehave framework. In this case, the .story files will be located
using the path of the story or step definition classes:
@Override
public Configuration configuration() {
Class<? extends Embeddable> embeddableClass = this.getClass();
// Start from default ParameterConverters instance
ParameterConverters parameterConverters = new ParameterConverters();
// factory to allow parameter conversion and loading from external resources (used by StoryParser too)
ExamplesTableFactory examplesTableFactory = new ExamplesTableFactory(new LocalizedKeywords(), new LoadFromClasspath(embeddableClass), parameterConverters);
// add custom converters
parameterConverters.addConverters(new DateConverter(new SimpleDateFormat("yyyy-MM-dd")),
new ExamplesTableConverter(examplesTableFactory));
return new MostUsefulConfiguration()
.useStoryLoader(new LoadFromClasspath(embeddableClass))
.useStoryParser(new RegexStoryParser(examplesTableFactory))
.useStoryReporterBuilder(new StoryReporterBuilder() .withCodeLocation(CodeLocations.codeLocationFromClass(embeddableClass))
.withDefaultFormats()
.withFormats(CONSOLE, TXT, HTML, XML))
.useParameterConverters(parameterConverters);
}
We used the
JUnitStory class so that we can execute these tests with
JUnit Test Runner.
At the end of the execution,
JBehave generates an
HTML report with a detailed status of the
stories executed, stories passed, or failed.